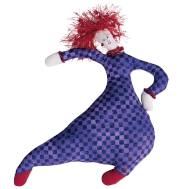
Your fabric, yarn and bead choices will determine the
personality of your diva.
Deprecated: wp_make_content_images_responsive is deprecated since version 5.5.0! Use wp_filter_content_tags() instead. in /home/sewing/dev.sewing.org/wp-includes/functions.php on line 4779
Materials
Makes 1
- 1/3 yd. OR 1 fat quarter cotton print fabric (body)
- 1/8 yd. OR 3″ X 7″ piece skin color fabric (head and hands)
- 1/8 yd. OR 2″ X 6″ piece contrast fabric (shoes)
- 2 yds. yarn OR decorative trim (hair)
- Small beads as desired (jewelry)
- Beading needle and threader
- Zig® Millennium pigment ink five color pen set (face)
- 1/8 yd. paper-backed fusible adhesive
- 1/8 yd. OR 3″ X 7″ piece fusible knit interfacing (if using light color skin-tone fabric only)
- Thread
- Ffiberfill
- Seam sealant
- OPTIONAL: 1/2″ plastic ring (hanger),ms. designer®
Multipurpose Point and Tube Turner - Pattern
Deprecated: wp_make_content_images_responsive is deprecated since version 5.5.0! Use wp_filter_content_tags() instead. in /home/sewing/dev.sewing.org/wp-includes/functions.php on line 4779
Cut
Cut aas directed on pattern pieces.
NOTE: If using light color fabric for skin, fuse interfacing, according to manufacturer’s directions, to wrong side of skin color fabric before applying fusible adhesive.
Deprecated: wp_make_content_images_responsive is deprecated since version 5.5.0! Use wp_filter_content_tags() instead. in /home/sewing/dev.sewing.org/wp-includes/functions.php on line 4779
Directions
Scant 3/16″ seam allowance; 15-20 stitches per inch
1. Following manufacturer’s directions, fuse head, hands and shoes to body pieces.
2. Satin stitch along the neck, wrist and ankle edges of head, hands and shoes.
3. RST and raw edges matching, stitch front to back, leaving a 3″ opening along the bottom straight edge. Apply seam sealant sparingly to stitching line. Let dry.
4. Trim, notch and clip curves and corners. Turn. HINT: Use Multipurpose Point and Tube Turner.
5. Stuff as firmly as desired. Stitch opening with small ladder stitches.
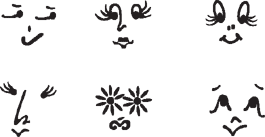
6. Referring to photo and diagram, draw face using black and red pens.
7. Stitch beads to head, neck and wrist(s) as desired for jewelry (earrings, necklace and bracelets)
8. Hand stitch 1″-2″ lengths or loops of yarn to top of head as desired for hair.
9. OPTIONAL: Stitch plastic ring to back neck/shoulder area for hanger.