Deprecated: wp_make_content_images_responsive is deprecated since version 5.5.0! Use wp_filter_content_tags() instead. in /home/sewing/dev.sewing.org/wp-includes/functions.php on line 4779
This easy wine sack makes a quick “anytime” gift idea, especially with a pre-quilted fabric in neutral muslin tones as the backdrop for simple fusible appliqué with a wine country theme. And remember, pre-quilted means no lining is necessary! One half yard yields two sacks – one to keep and one to give. Go simple or elaborate, taking the idea further with your own added touches like hand or machine embroidery, stenciling, beadwork and more. Gold cording adds a luxurious finishing touch.
Materials
- ½ yard “Muslin Shoppe” Double-Faced Quilt fabric from Marcus Brothers (or other similar fabric) (makes two wine sacks)
- Assorted purples & greens from Color Works Hand Dyes – “Vegetable” Palette from Marcus Brothers (or other similar fabrics)
- 1 yard gold cording
- Fusible web on release paper
Instructions
1. Use 1/4” seam allowances.
2. Cut double-faced quilt fabric 15” wide x 18” long. Measure 11” down and 7” across. Place a small dot here to mark the center position for your appliqué collage. Clean finish the top edge with a serger, seam binding or decorative machine stitching. Turn under 1” at the top and hem by hand or machine.
3. Apply fusible web to the purple & green COLOR WORKS fabrics according to manufacturer instructions. Cut out circles in 2-3 different sizes from the purple fabrics; cut one stem and 2-3 leaf shapes from the greens. Remove fusible backing paper.
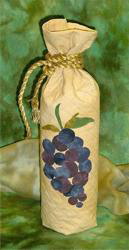
4. Arrange the grapes, leaves and stems, noting the placement dot at the center of the design. Be sure to cover the placement dot as you arrange the grapes. Use the photo for placement if desired. Fuse all appliqués into place. Add further stitching or embellishment if desired.
5. Fold sack in half lengthwise. With WRONG sides together, sew a ¼ ” seam allowance. Turn outside in. Now with right sides together, sew a 3/8” seam so that the original seam is encased in the second.
6. The sack is now in the shape of a tube with top & bottom open, with appliqué at the front and the lengthwise seam at the back. With WRONG sides together, sew bottom edge with a ¼ ” seam allowance. Turn outside in. Now with right sides together, sew a 3/8” seam so that the original seam is encased in the second.
7. To add depth at the bottom, flatten out each lower corner and sew across, about 1-1/2” in from the corner as shown.
8. Fold gold cording in half. Hand or machine sew the middle point of the cording to the seam of the wine sack, about 2” from the top edge. Insert bottle; wrap cording around bottleneck several time and tie.
Deprecated: wp_make_content_images_responsive is deprecated since version 5.5.0! Use wp_filter_content_tags() instead. in /home/sewing/dev.sewing.org/wp-includes/functions.php on line 4779
by Lisa Shepard Stewart
11/06