Deprecated: wp_make_content_images_responsive is deprecated since version 5.5.0! Use wp_filter_content_tags() instead. in /home/sewing/dev.sewing.org/wp-includes/functions.php on line 4779

Creator Marie Stevens used the many decorative stitches and embroidery features of the Janome Memory Craft 10000 to create this Heirloom Fantasy ensemble. Each ornament is different and created using a variety of heirloom techniques. This project can be created with the Memory Craft 9000 or 5700 as well. Marie recommends that if you do not own a Janome embroidery machine, you can easily create your own Heirloom Fantasy using decorative stitches.
Janome Supplies Required
- Memory Craft 10000
- Card Reader 10000
- Clothsetter 10000
- Standard Hoop A
- Embroidery Foot P
- Circular Sewing Attachment
- PC Design Card #1012 (K-Lace® Peacock Collection II)
- Memory Card #129 (K-Lace® Designs)
- Memory Card #131 (Cross Stitch Border Designs)
- Memory Card #149 (Heirloom Designs)
- Janome Embroidery Thread
- Janome Bobbin Thread
- Blue Tip needle 75/11
- Patterns
Fabric and Notions Required
|
|
Fabric Preparation
- Fold the satin fabric in half and half again.
- Place a yardstick where the folds meet. Measure out 30″. Make a small dot.
- Swivel the yardstick around keeping the end of the yardstick where you began, and make another mark.
- Continue until you have an arc shape on your fabric. Each dot should measure 30″ from the corner.
- Join the dots and cut out on this line. You now have a 60″ diameter circle.
- Cut a lining to match, either out of the satin or another fabric of choice. (Note: Marie used pre-washed muslin. If the lining fabric is less than 60″ wide it will have to be pieced.)
- Measure 2″ from the same corner to form a 2″ circle. Cut out. This opening is to go around the tree.
- Open the folded fabric so you have a half circle.
- Measure from the corner to 3″ at the bottom of the fold. Draw a line and cut on this line. This is your back opening. (Note: If you were to just cut a slit from the opening at the top, down to the bottom, your tree skirt would lie flat on the floor. By cutting a wedge shape the skirt will “tent” a little, helping it to fall gracefully around the tree.)
- Make a template from the large bell using the pattern piece provided above.
- Starting 10″ on each side of the center front, draw the bell six times evenly around the skirt.
- Cut six 9″ squares from the lace yardage.
- Spray starch and press each square.
- Spray the wrong side of each square with spray adhesive and place on top of the bells.
- Pin insertion lace around each bell, mitering at the corners.
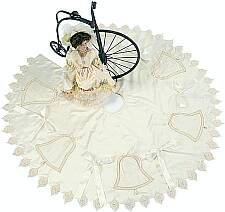 Tree Skirt
- Set up the MC10000 for Ordinary sewing.
- Thread the needle and bobbin with 50wt. cotton thread.
- Select Zigzag stitch #8. Adjust the width to 2.5 and length to 1.5.
- Zigzag around the inside lace edging. Cut away the excess lace yardage.
- Thread the needle with Janome embroidery thread.
- Select a decorative hemstitch. Adjust the width to 5.0.
- Sew around the inside and the outside of the lace.
- Carefully press the bells.
- Sew a small tassel at the bottom center of each bell.
- Sew a small bow at the top of the bells using the 1/4″ ribbon.
- Make and attach a bow between each of the bells using 1 yard of the 2″ ribbon.
- Attach Velcro strip to the right side of one edge on the satin and one edge on the pre-washed muslin.
- Sew the lining to the skirt. Be sure to leave an opening for turning along one of the back seams. Press.
- Set up the MC10000 for Professional-Style Embroidery.
- Insert PC Design Card #1012 (K-Lace® Peacock Collection II) into the machine.
- Press the Embroidery Mode key.
- Press the PC Card tab. Select Design #13.
- Place water-soluble stabilizer in the Standard Hoop A.
- Stitch approximately fifty designs.
- Remove stabilizer following manufacturer’s instructions.
- Hand-sew each motif around the bottom of the skirt at 1″ intervals.
Ornaments
Embroidered Heart
- Set up the MC10000 for Professional-Style Embroidery.
 Connect the Card Reader 10000 to the machine.
- Insert Memory Card #149 (Heirloom Designs) into the Card Reader 10000.
- Press the Embroidery Mode key.
- Press the Card Reader tab. Select Design #4.
- Cut two 9″ squares from satin fabric.
- Iron stabilizer to wrong side of one of the 9″ squares.
- Place fabric in the Standard Hoop A.
- Stitch design.
- Draw a heart, using the pattern piece provided, around the embroidery on the wrong side. Be sure to include seam allowance.
- Place the two squares of satin right sides together. Sew completely around the heart.
- Cut a 2″ slit on the back of the heart and turn right side out.
- Stuff with Polyfil. Close the slit with a slipstitch.
- Hand sew pearl beads around the seam and form a bead loop for hanging.
Lace Heart
- Set up the MC10000 for Professional-Style Embroidery.
 Connect the Card Reader 10000 to the machine.
- Insert Memory Card #129 (K-Lace® Designs) into the Card Reader 10000.
- Press the Embroidery Mode key.
- Press the Card Reader tab. Select Design #7.
- Place water-soluble stabilizer in the Standard Hoop A.
- Stitch design.
- Set up the MC10000 for Ordinary sewing.
- Cut two 6″ squares from satin fabric.
- Iron stabilizer to wrong side of one of the 6″ squares.
- Spray the lace heart with fabric adhesive. Place in the center of the 6″ square of satin.
- Select Zigzag stitch #8. Stitch around the design.
- Draw a heart, using the pattern piece provided, around the embroidery on the right side. Be sure to include seam allowance.
- Sew a length of edging lace on the drawn line with the lace facing the center.
- Place the two squares of satin right sides together. Sew completely around the previously sewn line.
- Cut a 2″ slit on the back of the heart and turn right side out.
- Stuff with Polyfil. Close the slit with a slipstitch.
- Hand sew a lace hoop to the top of the heart and pearl beads on lace heart.
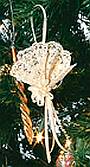 Fan
Fan
- Spray starch and press a 9″ length of 3″ ecru lace.
- Fold and press into 1/2″ pleats.
- Draw together with a gathering stitch along one edge.
- Sew a rosette on the front.
- Sew a loop on the back for hanging. Hint:If you can’t find 3″ wide lace, whip narrow laces together to make 3″.
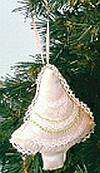
Bell
- Set up the MC10000 for Ordinary sewing.
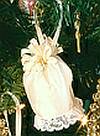 Cut one 4″ x 8″ piece from satin fabric.
- Sew a length of ruffled lace along the bottom edge.
- Join the two short sides with an overcast stitch.
- Roll and whip the top edge.
- Run two rows of gathering stitches along the top and draw in closely.
- Place the stem of a small silk flower up and through the gathered top leaving the flower hanging inside the bell.
- Wrap the wire around the gathering and secure.
- Make a ribbon rosette and sew on top. Attach a ribbon loop.
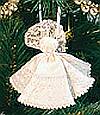
Lace Angels
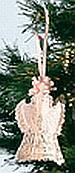 Set up the MC10000 for Professional-Style Embroidery.
- Connect the Card Reader 10000 to the machine.
- Insert Memory Card #129 (K-Lace® Designs) into the Card Reader 10000.
- Press the Embroidery Mode key.
- Press the Card Reader tab. Select Design #1.
- Place water-soluble stabilizer in the Standard Hoop A.
- Stitch design three times.
- Join the wings and the top of the heads.
- Top with a ribbon rosette and loop.
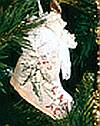
Dove
- Set up the MC10000 for Ordinary sewing.
 Cut two 9″ squares from lace and satin fabric.
- Adhere each square of lace to the right side of each square of satin using the spray adhesive.
- Place the satin/lace fabric right sides together.
- Draw the dove shape, using the pattern piece provided on the wrong side.
- Sew the dove.
- Turn right side out by making a small slit on the side of the dove where you will place the wing.
- Make two wings out of satin using the pattern provided. Turn right side out.
- Stuff the dove and wings.
- Hand-sew pearl beads around the seam of the dove.
- Hand-sew the wings to the dove.
- Use two small beads for the eyes, one on each side of the head.
- Make a ribbon loop for hanging.
Christmas Tree
- Set up the MC10000 for Ordinary sewing.
 Cut two 6″ squares of satin.
- Draw a tree shape on the right side of each square, using the pattern piece provided.
- Starting at the bottom of the tree, sew a row of decorative stitches.
- Continue up the tree, using different colors of thread and different stitches.
- Sew small lengths of lace edging between the rows.
- Repeat for both side of tree.
- Baste lace around the right side along the outside of the tree.
- Place right sides together and sew around the tree. Be sure to leave an opening for turning on one side of the tree trunk.
- Stuff and whip stitch the opening. Add a ribbon loop.
Christmas Stocking
- Set up the MC10000 for Professional-Style Embroidery.
 Connect the Card Reader 10000 to the machine.
- Insert Memory Card #131 (Cross Stitch Border Designs) into the Card Reader 10000.
- Press the Embroidery Mode key.
- Press the Card Reader tab. Select Design #9.
- Cut two 9″ squares from satin.
- Iron stabilizer to wrong side of each 9″ squares.
- Place fabric in the Standard Hoop A.
- Stitch design.
- Repeat for other square reversing the design using the Edit Screen.
- Draw the outline of the stocking around one of the embroideries on the wrong side, using the pattern piece provided.
- Place right sides together, and sew around outline. Be sure to leave the top open.
- Sew ruffled lace around the top and stuff half way up the stocking.
- Place 3 small silk flowers in the stocking and add a ribbon loop.
Lovebirds
- Set up the MC10000 for Ordinary sewing.
 Cut four 6″ squares from satin fabric and lace.
- Adhere the lace squares to the fabric squares with spray adhesive.
- Place the satin/lace fabric right sides together.
- Draw the lovebird shape, using the pattern piece provided on the wrong side.
- Sew the birds.
- Turn right side out by making a small slit on the side of the birds where you will place the wing.
- Stuff each bird with Polyfil.
- Make eight small wings out of satin/lace using the pattern provided. Turn right side out. Do not stuff.
- Select Zigzag stitch #8. Sew around the edges of the wings.
- Hand-sew the “beaks” together.
- Hand-sew pearl beads around the seam of both birds.
- Hand-sew small beads for the eyes.
- Hand-sew the wings on the birds. Add a ribbon loop for hanging.
Angel
- Set up the MC10000 for Ordinary sewing.
 Attach the Circular Sewing Attachment. Set at a 5″ radius.
- Cut one 7″ square from satin.
- Select Decorative stitch #39. Adjust the length to .20. Sew a scallop stitch around circle.
- Move the marker to 4-1/2″. Sew a second row of decorative stitches.
- Moving in 1/2″ each time, select a different stitch and sew two more rows.
- Carefully cut out each scallop and secure with fray check.
- Make the head by placing a cotton ball in the center of the circle and drawing in tightly.
- Wrap ribbon around the neck and form a loop.
- Gather a 5″ length of lace and sew to the back of the head to form a halo.
Star
- Set up the MC10000 for Professional-Style Embroidery.
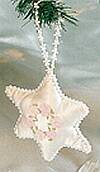 Connect the Card Reader 10000 to the machine.
- Insert Memory Card #131 (Cross Stitch Border Designs) into the Card Reader 10000.
- Press the Embroidery Mode key.
- Press the Card Reader tab. Select Design #3.
- Cut two 9″ squares from satin.
- Iron stabilizer to wrong side of each 9″ squares.
- Place fabric in the Standard Hoop A.
- Stitch design.
- Repeat for other square using Design #18.
- Draw the outline of the star around one of the embroideries on the wrong side, using the pattern piece provided.
- Place right sides together, and sew around outline. Be sure to leave an opening.
- Turn right side out and stuff. Whipstitch the opening.
- Hand-sew beads around star edges. Add a bead loop.
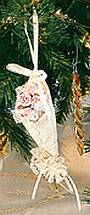 Cornucopia
- Set up the MC10000 for Ordinary sewing.
- Cut one 5″ square from satin and lace.
- Adhere the lace square to the fabric square with spray adhesive.
- Wrap the scalloped lace around the edge of the satin/lace square.
- Sew the edges with Decorative stitch #39 along the lace side.
- Wrap around forming a cone. Handstitch in place.
- Attach a ribbon loop to the top.
- Sew a small ribbon rosette to the bottom.
- Stuff half way with Polyfil. Place 3 or 4 small silk flowers inside.
Note: A drop of white glue inside the Polyfil will secure the flowers.
Deprecated: wp_make_content_images_responsive is deprecated since version 5.5.0! Use wp_filter_content_tags() instead. in /home/sewing/dev.sewing.org/wp-includes/functions.php on line 4779
Created by Marie Stevens, Educational Coordinator
As Seen in Janome Digest Magazine Issue #18
12/03