Deprecated: wp_make_content_images_responsive is deprecated since version 5.5.0! Use wp_filter_content_tags() instead. in /home/sewing/dev.sewing.org/wp-includes/functions.php on line 4779
This whimsical collar takes 15 minutes of machine sewing and about 45 minutes of hand stitching to get the jingle bells on. Just the kind of thing you can work on while riding in the car or watching TV.
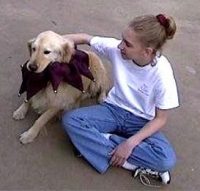
Developed for a greyhound, these collars look good on any dog. And the jingle bells add a festive air, whether your dog is dressing up as a jester or donning his collar for the holidays. Size may need to be adjusted to fit your dog.
Deprecated: wp_make_content_images_responsive is deprecated since version 5.5.0! Use wp_filter_content_tags() instead. in /home/sewing/dev.sewing.org/wp-includes/functions.php on line 4779
Materials Needed
- 1/2 yard of fleece or other thick or stiff fabric, 60” wide
- 10 jingle bells (3/8” to 1/2” in diameter)
- approximately 14” of 1/4”-wide elastic
- Pattern
Deprecated: wp_make_content_images_responsive is deprecated since version 5.5.0! Use wp_filter_content_tags() instead. in /home/sewing/dev.sewing.org/wp-includes/functions.php on line 4779
Directions
1. Fold the fabric in half to form one long skinny rectangle 9” x 60”. First mark the “ditch” points, as shown in the diagram below, as follows: Make a mark along the 9” side, measuring up 4” from the fold. Then make a mark every 6” across the length of the fabric; each of these marks will be 4” up from the fold.
2. Mark the “tip” points, as follows: Make a mark along the 60”-long raw edge, measuring in 3” from the 9” side. Then make a mark every 6” from this first mark along the 60”-long raw edge. These “tips” should be 9” from the folded edge. Note that the “tips” are offset from the “ditch” marks by 3”.
3. Sew in a saw-tooth pattern to join the marks. The result should look like the diagram above. If your fabric frays easily, it’s best to stitch on top of the first stitching to reinforce the “ditches” and “tips.”
4. Trim about 1/4” to 1/2” away from the stitching line; start cutting from the raw edge – DON’T cut the folded edge. Be sure to clip all the way down to the stitches in the “V’s” that form the “ditches.” And be sure to trim fabric away quite close to the “tips.”
 5. Turn the jagged tube right side out. Gently poke the “tips” out using a
point turner or other blunt or rounded object. Note: if you use the point of a closed scissors to push out the “tips,” you run the risk of pushing the scissors all the way through the fabric.
6. Feed the elastic through the tube and sew the two ends of the elastic together.
7. Use a whip stitch to hand-sew the two ends of the collar together to form the round collar shape.
8. Sew a jingle bell on each of the 10 points.
Deprecated: wp_make_content_images_responsive is deprecated since version 5.5.0! Use wp_filter_content_tags() instead. in /home/sewing/dev.sewing.org/wp-includes/functions.php on line 4779
12/05