Deprecated: wp_make_content_images_responsive is deprecated since version 5.5.0! Use wp_filter_content_tags() instead. in /home/sewing/dev.sewing.org/wp-includes/functions.php on line 4779
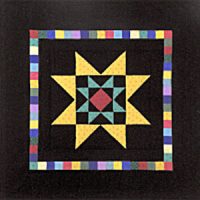
Making this striking wall hanging is so easy when using rotary cutting techniques. Stitch strips of fabric together and then cut the strips to create a colorful pieced border.
Time for completion: Weekend
Skill level: 3 of 5 (1 being the easiest)
Materials List
Fabric Needed:
- Black: 1-1/2 yards (includes backing and binding)
- Gold (large star points): 1/8 yard
- Scraps of green and fuchsia for small star
- Eight to ten coordinating colors for pieced border
Sizes to Cut:
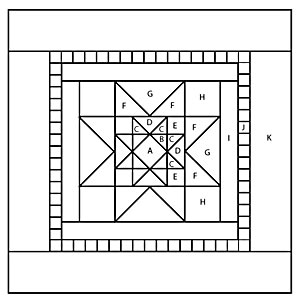
Center 12″ Square (cut into triangles as shown)
| A – Fuchsia: One 2-1/2″ square |
Inner Border Pieced Border Outer Border |
|
| B – Black: Two 2-3/8″ squares | ||
| C – Green: Four 2-3/8″ squares | ||
| D – Black: One 4-1/4″ square | ||
| E – Black: Four 2″ squares | ||
| F – Gold: Four 3-7/8″ squares | ||
| G – Black: One 7-1/4″ square | ||
| H – Black: Four 3-1/2″ squares | ||
 Instructions
Piecing:
[Figure A and Figure B are to the sides of these instructions – see original project.]
1. Sew B triangles to center square A.
2. Make 2 sets of C – D – C. Sew to A B square.
3.Make 2 sets of E – C – D – C – E. Sew to remaining 2 sides.
4. Make 2 sets of F – G – F. Sew to top and bottom of square.
5. Make 2 sets of H – F – G – F- H. Sew to remaining sides.
Inner Border (I)
1. Sew two 2″ x 12-1/2″ borders to sides.
2. Sew two 2″ x 15-1/2″ borders to top and bottom.
Pieced Border (J)
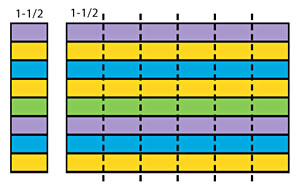
1. Sew eight to ten 1-1/2″ x 14″ strips together. Re-cut sewn strips into 1-1/2″ segments.
2. Sew end to end to fit edges of square.
Outer Border (K)
1. Sew two 3-1/2″ x 17-1/2″ borders to sides. 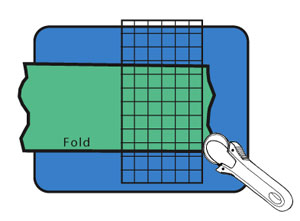
2. Sew two 3-1/2″ x 24-1/2″ borders to top and bottom.
Finishing:
1. Cut backing. Layer quilt. Machine stitch around patchwork design and borders. Bind edges.
Helpful Tips
Straight, Accurate Cutting:
Always use laser-cut acrylic rulers with your rotary cutter and cutting mat. When cutting, press down firmly on the ruler. Always cut away from your body, rolling the blade against the edge of the ruler. Practice until you are able to get a straight, smooth cut.
First Cut:
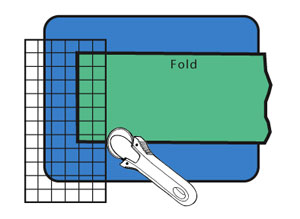
To straighten the edge of your fabric and trim away the raw edge, fold fabric in half lengthwise. Place ruler on fabric with raw edges to your right (opposite for left-handers). Line up the grid lines on your ruler with the fold of the fabric. Cut along the edge at a 90-degree angle to the fold.
 Cutting Strips:
Turn fabric so trimmed edge of fabric is on the left (opposite for left- handers). To cut fabric strips, decide on desired width of strip. Place ruler over cut edge of fabric at desired width. Make sure the vertical lines of ruler are parallel to the cut edge of fabric. The horizontal lines of the ruler should be parallel to the fold of the fabric. Cut fabric strip.
Cutting Corners:
Cut beyond the corner point on one side, and then cut along the other side beyond corner.
Larger Cutting Surface:
Butt two cutting mats together and secure with masking tape from the underside.
Cutting Paper & Vinyl:
Rotary cutters can be used to cut paper and vinyl. Always keep these blades separate and never use them to cut fabric. Use dull blades to cut paper.
Using the 60mm Rotary Cutter:
This cutter can be used for most projects. The larger blade provides more cutting surface with fewer revolutions.
Care:
Keep cutting mats clean by wiping with a soft, damp cloth.
Deprecated: wp_make_content_images_responsive is deprecated since version 5.5.0! Use wp_filter_content_tags() instead. in /home/sewing/dev.sewing.org/wp-includes/functions.php on line 4779
Designed by Arlene Poltrack
8/04