Deprecated: wp_make_content_images_responsive is deprecated since version 5.5.0! Use wp_filter_content_tags() instead. in /home/sewing/dev.sewing.org/wp-includes/functions.php on line 4779
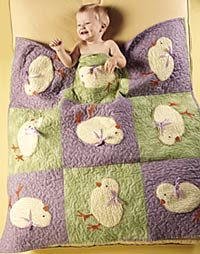
Finished Quilt is (40-1/2″ x 40-1/2″)
Your favorite little one will love snuggling up to this fuzzy, flannel-backed baby quilt that’s as easy to make as it is cute!
Deprecated: wp_make_content_images_responsive is deprecated since version 5.5.0! Use wp_filter_content_tags() instead. in /home/sewing/dev.sewing.org/wp-includes/functions.php on line 4779
Materials
- 5 fat quarters of lilac calico
- 4 fat quarters of lime calico
- 1 fat quarter of orange calico
- 1/2 yard of yellow chenille
- 1-1/2 yards of lavender flannel for backing
- 4 yards of 3/8″ lavender ribbon
- Black beads
- 2 packages of Heat ‘n Bond® fusible web
- Crib-size quilt batting
- Peep Pattern
Deprecated: wp_make_content_images_responsive is deprecated since version 5.5.0! Use wp_filter_content_tags() instead. in /home/sewing/dev.sewing.org/wp-includes/functions.php on line 4779
Tools
Scissors, iron and ironing board, sewing machine, rotary cutter and mat, safety pins, needle and matching thread, invisible thread.
Deprecated: wp_make_content_images_responsive is deprecated since version 5.5.0! Use wp_filter_content_tags() instead. in /home/sewing/dev.sewing.org/wp-includes/functions.php on line 4779
Directions
(Note: all seams are 1/4″)
1. Cut five 14″ squares of lilac calico. Cut four 14″ squares of lime calico. Cut eleven 2-1/2″ strips for binding; strips should measure 2-1/2″ x 18″. Set aside.
2. For each square, enlarge chick body, feet, and beak pattern 200% and trace on paper side of Heat ‘n Bond®. Follow manufacturer’s directions to fuse body tracing to chenille, and feet and beak to orange calico. Cut and fuse to squares.
3. Machine appliqué as desired, using zigzag, button-hole, or straight stitch.
4. With colors alternating, sew blocks together in rows of three. Sew rows together.
5. Cut one 44″ x 44″ square of flannel for backing. Cut one 44″ x 44″ square of batting.
6. To layer, place backing right side down and lay batting over backing. Place quilt top right side up on top of the batting. Beginning at the center of the quilt top, pin the layers together every 4” to 6″, smoothing the fabric as you work toward the edges.
7. Quilt as desired, or use photo for reference. If machine quilting, use a quilting foot. Adjust stitch length to 6 to 12 stitches per inch, and loosen upper tension if using invisible thread. Begin in the center of the quilt top and quilt outward in all directions.
8. Sew the eleven 2-1/2″ x 18″ strips together end-to-end in alternating colors to form the binding. Press all seams open. With wrong sides together, fold and press the binding strip in half lengthwise. Turn the short raw edge of the binding strip to the inside.
9. Beginning at the center of one side, match the raw edges of the binding strip and the quilt top. Begin sewing the binding to the quilt top through all layers. Stop sewing 1/4″ from the corner of the quilt top; backstitch and clip threads. To sew the corners, remove quilt top from under presser foot. Fold the binding strip up, creating a diagonal fold. Hold this fold in place with a finger. Fold the binding down to create a fold at the top edge and align with the adjacent quilt edge. Sew through the top fold, stitching through all layers. Continue around quilt, repeating diagonal fold at each corner.
10. When the binding meets at the start point, insert end of the binding into the folded binding and continue stitching. Clip threads and remove quilt from the sewing machine.
11. Trim excess batting and backing even with the quilt top. Fold binding over the seam to the back of the quilt. Hand-stitch the binding to the backing fabric to cover machine stitching.
12. Make small bows and attach at each chick neck. Sew black beads in place for eyes. Double stitch bows and beads to secure firmly. Alternate eye option: use DMC® black floss or pearl cotton to create a French knot.
Approximate Crafting Time: 8 hours
Skill Level: Intermediate
Deprecated: wp_make_content_images_responsive is deprecated since version 5.5.0! Use wp_filter_content_tags() instead. in /home/sewing/dev.sewing.org/wp-includes/functions.php on line 4779
3/04