Deprecated: wp_make_content_images_responsive is deprecated since version 5.5.0! Use wp_filter_content_tags() instead. in /home/sewing/dev.sewing.org/wp-includes/functions.php on line 4779
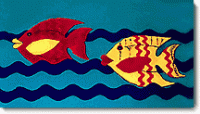
Fun to make and soooooo easy! Attach them to a wire or stick and use as a plant poke or hang in your window. You can also do a “nautical” theme party and use them as a centerpiece or hang them in an empty fish tank for a conversation piece!
Deprecated: wp_make_content_images_responsive is deprecated since version 5.5.0! Use wp_filter_content_tags() instead. in /home/sewing/dev.sewing.org/wp-includes/functions.php on line 4779
Materials
- Enough for 1 red and 1 yellow fish
- 1 pkg. Wrights® Orange Medium Rick Rack (#117-401-058)
- 1 8 1/2″ x 11″ Yellow Stiffened Felt
- 1 8 1/2″ x 11″ Red Stiffened Felt
- 1 pkg. Medium Animal Eyes
- Fiber Fill
- Green Magic Marker
- Fabric Glue
- Pattern
Deprecated: wp_make_content_images_responsive is deprecated since version 5.5.0! Use wp_filter_content_tags() instead. in /home/sewing/dev.sewing.org/wp-includes/functions.php on line 4779
Instructions
1. Cut pattern from project sheet. Cut fish, fish lips and fins; 2 each from red and yellow felt.
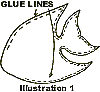
2. Lay a bead of glue around internal edge of yellow fish leaving mouth end open (see illustration 1).
3. Lay fish, glue side down, onto matching piece and press in place. Let dry. Alternatively, you could sew around or serge all edges, leaving the mouth open.
4. Fill fish at mouth with fiber fill for extra body.
5. Glue or hand-stitch mouth shut.
6. Glue red fish lips and fins, (one on front and one on back) of fish and press in place.
7. Cut enough rick rack to go around body, front and back.
8. Begin gluing rick rack to body at top of fish (use photo as your guide).
9. Continue to glue rick rack around body to other side of fish.
10. Glue final end of rick rack at top of back of fish (where you began).
11. Repeat steps 9-11 for a total of two stripes on fish body and one stripe on fish tail (you may add more if desired).
12. Glue eye to fish (refer to photo for placement).
13. Draw additional details on fish with magic marker (refer to photo for placement).
14. Repeat steps 3-14 for red fish, using alternate colors.
Deprecated: wp_make_content_images_responsive is deprecated since version 5.5.0! Use wp_filter_content_tags() instead. in /home/sewing/dev.sewing.org/wp-includes/functions.php on line 4779
6/07