Deprecated: wp_make_content_images_responsive is deprecated since version 5.5.0! Use wp_filter_content_tags() instead. in /home/sewing/dev.sewing.org/wp-includes/functions.php on line 4779

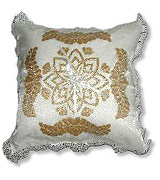
When only the best will do, embroider this elegant pillow.
Deprecated: wp_make_content_images_responsive is deprecated since version 5.5.0! Use wp_filter_content_tags() instead. in /home/sewing/dev.sewing.org/wp-includes/functions.php on line 4779
Materials and Supplies
- 1/2 yard gold lamé
- 1/2 yard sheer organza
- 1/2 yard satin (cut into two 15″ squares)
- 1-1/2 yard, 2″-wide bridal lace
- 1-1/2 yard of 1/4″-wide white satin ribbon
- 14″ pillow form
- White polyester thread for sewing
- White embroidery thread from brother (001)
- Brother PC6500, PC8200, PC-8500 or ULT2001/ULT2002D
- 5” x 7″ embroidery hoop
- Brother Card No. 58
- Templates for designs No. 31 and No. 38
- Water soluble marking pen
Deprecated: wp_make_content_images_responsive is deprecated since version 5.5.0! Use wp_filter_content_tags() instead. in /home/sewing/dev.sewing.org/wp-includes/functions.php on line 4779
This project is specific to a particular brand of sewing machine, notion, fabric and/or supply. However, the project may be easily adapted to other brands.
Deprecated: wp_make_content_images_responsive is deprecated since version 5.5.0! Use wp_filter_content_tags() instead. in /home/sewing/dev.sewing.org/wp-includes/functions.php on line 4779
Level of Difficulty: Beginner
Deprecated: wp_make_content_images_responsive is deprecated since version 5.5.0! Use wp_filter_content_tags() instead. in /home/sewing/dev.sewing.org/wp-includes/functions.php on line 4779
Embroidery Directions

- Using 1/2 yard piece of sheer organza, lay template on fabric and mark placement for designs beginning with the center design (No. 31).
- Load marked organza in hoop.
- Insert card into machine and select design No. 31. Place hooped fabric in machine.
- Slide gold lamé under hoop. Stitch design with white embroidery thread.
- Remove fabric from hoop. Carefully trim excess gold lamé from backside of design close to stitching line.
- Rotate fabric in order to stitch the matching side of center design. Using the template markings, load fabric in hoop. Slide another piece of gold lamé under hoop. Stitch design.
- Unhoop fabric and carefully trim excess fabric from back of stitched design.
- Mark placement for side designs using design No. 38 from the card.
- Load fabric for one side, slide gold lamé under hooped fabric and stitch design. Unhoop fabric and trim close to stitching line.
- Repeat for 3 remaining sides.
- Press the pillow top from wrong side. Starch if desired.
Deprecated: wp_make_content_images_responsive is deprecated since version 5.5.0! Use wp_filter_content_tags() instead. in /home/sewing/dev.sewing.org/wp-includes/functions.php on line 4779
Sewing Directions
- Cut 1/4″ satin ribbon in half. Layer one ribbon on top of the other at a 90-degree angle. Using the button sew-on feature, tack ribbons to pillow top in center.
- Trim embroidered organza to 15″ square.
- Baste to one 15″ satin square.
- Pin bridal lace in place around outside edges of pillow top, mitering corners. Sew in place using 1/4″ seam.
- Placing the two 15″ satin squares wrong sides facing each other, stitch the four sides together using a 1/2″ seam allowance. Leave an 8″ opening on one side to insert pillow form.
- Insert pillow form and slipstitch opening closed by hand.
Deprecated: wp_make_content_images_responsive is deprecated since version 5.5.0! Use wp_filter_content_tags() instead. in /home/sewing/dev.sewing.org/wp-includes/functions.php on line 4779
Project developed by Keri Morales, Education Consultant
4/04