Deprecated: wp_make_content_images_responsive is deprecated since version 5.5.0! Use wp_filter_content_tags() instead. in /home/sewing/dev.sewing.org/wp-includes/functions.php on line 4779

Deprecated: wp_make_content_images_responsive is deprecated since version 5.5.0! Use wp_filter_content_tags() instead. in /home/sewing/dev.sewing.org/wp-includes/functions.php on line 4779
Materials
- Standard 4 1/2″ (11.25 cm) square double switchplates
- Standard 3″ x 4″ (7.5 cm x 10.66 cm) single switchplates
- Tacky glue
- Razor blade cutting tool
- Wire cutters 8″ (20 cm) length black craft wire
- 12″ (30 cm) length rope-colored yarn
- 8″ (20 cm) square background fabric per switchplate
- 12″ (30 cm) length green floral or craft wire
- 12″ (30 cm) 1/8″ pink satin ribbon
JHB Button Styles |
||
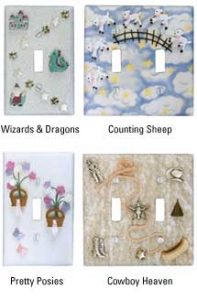
| Wizards & Dragons #95170 – (5) #23461 – (5) #23348 – (1) #23347 – (1) #23349 – (1) Counting Sheep |
Pretty Posies #35745 – (3) #35746 – (2) #35741 – (3) #35740 – (2) #23539 – (2) #37698 – (1) #37697 – (1) |
Cowboy Heaven #90199 – (1) #90201 – (1) #95307 – (1) #90485 – (1) #90200 – (1) #90246 – (1) #20071 – (1) |
Deprecated: wp_make_content_images_responsive is deprecated since version 5.5.0! Use wp_filter_content_tags() instead. in /home/sewing/dev.sewing.org/wp-includes/functions.php on line 4779
Instructions
1. Trim fabric to size of switchplate plus 1″ (2.5 cm) on all sides.
2. Glue background fabric to front and side edges of switchplate, smoothing out air pockets and mitering corners. Let dry completely.
3. Use the razor edge cutting tool to cut an “X” in fabric covering the light switch holes. Fold excess fabric to back and glue.
4. Remove shanks from buttons with wire cutters and glue to switchplate, as illustrated.
5. Glue craft wire (fence & stems), yarn (rope) and ribbon (on flower baskets) in place as shown.
Deprecated: wp_make_content_images_responsive is deprecated since version 5.5.0! Use wp_filter_content_tags() instead. in /home/sewing/dev.sewing.org/wp-includes/functions.php on line 4779
6/06