Deprecated: wp_make_content_images_responsive is deprecated since version 5.5.0! Use wp_filter_content_tags() instead. in /home/sewing/dev.sewing.org/wp-includes/functions.php on line 4779
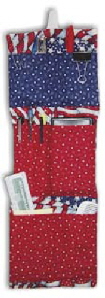
Hang this convenient organizer in your school, gym, or work locker to organize all your supplies. You can customize it by stitching different divisions in the pockets or by making it longer.
Pattern Level: Easy
Seam Allowance: 1/4″ used throughout and has been added.
Finished size: 7” x 19”
Materials Needed:
(Note: Fabrics used are from the Cranston Patriotic Calicos Collection.)
- 1/4-yard wavy flag
- 1/4-yard navy with white stars
- 1/4-yard red with white stars
- 1/4-yard polyester fleece
- matching thread
- 1”-wide twill tape or grosgrain ribbon
Cutting
From wavy flag cut: 2 pieces 7 1/2″ x 19 1/2″ for front and back
From navy with white stars cut: 2 pieces 6” x 7 1/2″ for upper pocket
From red with white stars cut: 4 pieces 4 1/2″ x 7 1/2″ for two lower pockets
From fleece cut: 1 piece 7 1/2″ x 19 1/2″
Assembly
 Pin navy pocket pieces right sides together and sew along both 7 1/2″ edges, leaving remaining short ends open for turning. Repeat for remaining two red pockets. Turn all pockets right side out and press.
For front, pin one wavy flag piece right side up on top of fleece, with raw edges even. Baste to fleece along edges. Pin pockets in place with raw edges even, spacing as indicated in Figure 1. Baste in place along side edges. Stitch pockets to front piece by sewing close to each lower pocket edge.
Cut a 9” piece of twill tape or grosgrain ribbon and fold in half crosswise. Pin to center top of locker pocket front with raw edges even and loop towards the locker pocket; baste in place.
Pin locker pocket back to locker pocket front, right sides together and with raw edges even. Sew around all edges leaving an opening for turning along the bottom edge. Clip corners and turn right side out through the opening. Stitch opening closed. Stitch divisions in the pockets as desired. We stitched three 1” divisions in the center pocket to hold pens or pencils, and a center division in the remaining two pockets.
While all possible care has been taken to ensure the accuracy of this pattern, we are not responsible for printing errors or the way in which individual work varies.
Deprecated: wp_make_content_images_responsive is deprecated since version 5.5.0! Use wp_filter_content_tags() instead. in /home/sewing/dev.sewing.org/wp-includes/functions.php on line 4779
By Adrienne Franklin.
9/03