Deprecated: wp_make_content_images_responsive is deprecated since version 5.5.0! Use wp_filter_content_tags() instead. in /home/sewing/dev.sewing.org/wp-includes/functions.php on line 4779
Deprecated: wp_make_content_images_responsive is deprecated since version 5.5.0! Use wp_filter_content_tags() instead. in /home/sewing/dev.sewing.org/wp-includes/functions.php on line 4779
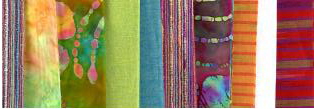
Textile Creations Fabric
- Desert Ridge DR-12
- Echo Lame 2234
- Desert Ridge DR-11
- Botanical Batiks BOB-36
- Bengal B-183
- Echo 2258
- Echo 2257
- Botanical Batiks BOB-32
- Lava Spray LS-10
- Bengal B-185
Materials
- 1/2 yard of the ten fabrics listed above
- 1-1/4 yard fabric for the back
- 4 yards of cording for the covered piping
- Batting
Cut
- Forty 8-1/2” squares for the reverse appliqué as follows
- 5 of DR-12
- 5 of BOB-36
- 2 of B-183
- 4 of 2234
- 3 of 2257
- 6 of BOB-32
- 5 of LS-10
- 2 of B-185
- 5 of DR-11
- 3 of 2258
- Two 45” x 2” strips of 2234
- Two 45” x 2” strips of DR-12
- Two 45” x 2” strips of 2258
- Two 45” x 2” strips of 2257
- Four 45” x 2” strips DR-11 for binding
- Four 45” x 2” strips BOB-36 for binding
- One 40” x 44” rectangle for the back
 Instructions
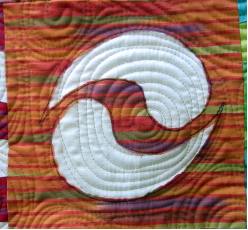
1. Draw two paisley motifs on the right side of twenty 8-1/2” squares.
2. Layer two squares on top of each other right side up and baste around the paisley. Finish with decorative stitch.
3. Cut out the TOP layer ONLY inside the stitching to reveal the bottom color and paisley design.
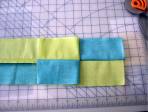
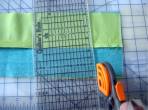
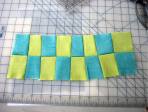
4. Construct the checker blocks by sewing two 45” x 2” strips together. Place right sides together and rotary cut with a slight angle once to the left once to the right. Sew right sides together to form a long strip; trim the strip to 3” wide.
|
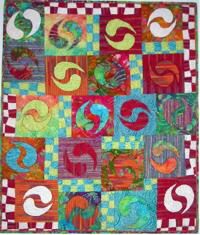
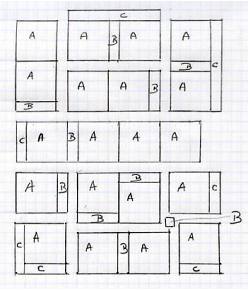
5. Use the following diagram to assemble the quilt:
- A = paisley block
- B = turquoise and green stripe
- C = white and red stripe
Deprecated: wp_make_content_images_responsive is deprecated since version 5.5.0! Use wp_filter_content_tags() instead. in /home/sewing/dev.sewing.org/wp-includes/functions.php on line 4779
6. Layer the backing, batting, and the assembled top.
7. Machine quilt free-hand with spirals of all sizes.
8. For the binding, sew the cord inside the orange fabric and onto the purple batik.
9. Sew the binding and edging to the back of the quilt, right sides together.
10. Fold binding to the front side of the quilt and stitch between the piping and green fabric.
11. Finish size 36” x 42”.


Deprecated: wp_make_content_images_responsive is deprecated since version 5.5.0! Use wp_filter_content_tags() instead. in /home/sewing/dev.sewing.org/wp-includes/functions.php on line 4779
Project developed by Pascale Gautier
12/05