Deprecated: wp_make_content_images_responsive is deprecated since version 5.5.0! Use wp_filter_content_tags() instead. in /home/sewing/dev.sewing.org/wp-includes/functions.php on line 4779
Supplies
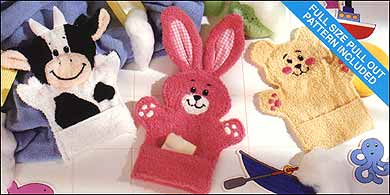
Cow
- Four Washcloths, two white, one black and one peach
- One 6″ x 3″ (15 cm) x 7.5 cm) piece of fabric, white
- Two Skeins Embroidery Floss, black and white
- Water Soluble Pen
- Paper Backed Fusing Web (opt.)
Bunny
- Four Washcloths, three pink, one white
- One 5″ x 5″ (12.5 cm) x 12.5 cm) Piece of Pink Gingham
- Two Skeins Embroidery Floss, black and white
- Water Soluble Pen
- Paper Backed Fusing Web (opt.)
Bear
- Two 12 1/2″ x 13″ (32 cm x 33 cm) washcloths, light brown
- Three Skeins Embroidery Floss, black, white and pink
- Water Soluble Pen
- Paper Backed Fusing Web (opt.)
Deprecated: wp_make_content_images_responsive is deprecated since version 5.5.0! Use wp_filter_content_tags() instead. in /home/sewing/dev.sewing.org/wp-includes/functions.php on line 4779
Instructions
Faces and Appliqués
- Pin patterns to washcloths placing bottom edges of puppet pattern on finished edge of cloth. Do not cut yet. Transfer MARKINGS for faces.
- Embroider nose, eyes and paw pads using a SATIN STITCH. Embroider mouth using a CHAIN STITCH. Cut out body pieces.
- Cut out appliqués for bunny ears and muzzle, cow head patches, body spots and muzzle. Appliqué pieces to puppet bodies.
Bunny Ears
- Appliqué gingham inset to front of ear.
- Stitch ear front to back.
- Trim Seams. Clip curves and turn right side out.
- Form tuck at the center of the ear.
- Baste ears to head, having raw edges even
Cow Ears and Horns
- Stitch ear front to back.
- Trim seams.
- Clip Curves and turn right side out. Fold along fold line. Baste to head, having raw edges even.
- Fold horns in half with right sides together, stitch curved edge. Turn right side out. Press seam to center back. Stuff lightly. Baste to head having raw edges even.
Body
- Fold up lower edge of puppet front along fold line, forming pocket. Baste along side edges to hold in place.
- Stitch front to back at side seams. Clip curves. Trim seams to 1/8″, turn right side out.
- Top stitch 1/8″ inch all around leaving lower edge open.